First of all, why make your own bias tape? Well aside from the fact you can get an exact match to what you are making, or choose your own funky contrast fabric, home-made bias tape is cheaper and better quality. The basic bias tape you can get at the haberdashers (they usually carry a rough cotton and a satin-y polyester type) are frankly rubbish. I'll use the cotton type occasionally when making toiles or as an interfacing, but even when I'm using bias tape as a facing that will never be seen I make my own these days. There are now fancy, pretty bias tapes with cute patterns available at places like John Lewis or Liberty's. I have never used them, they look to be better quality but are very expensive.
I am going to describe two ways of making a large quantity of bias tape. Method 1 is quicker and works better if you have a long thin piece of fabric, method 2 is more time consuming but maximises yardage especially if you have an odd shaped bit of fabric and makes it easier to match stripes.
You can use any woven fabric, but for best results use something lightweight that presses well. Prewash first if necessary. If you need to make bias tape out of something bulkier (e.g. suiting) then go for a wider tape. Here I have used cotton shirting (the green stripes) and linen (the blue stripes). I like using stripes for bias tape, but it also helps show where the grain of the fabric is.
You will need the same equipment whichever method you use. Scissors, marking tools (I have used black chalk in this tutorial for visibility but normally I would use something like air erasable marker) and realistically you will need a bias tape maker. I will mention how to make bias tape without one, but it is a faff, and the tape makers are cheap so I recommend getting one.
 |
| From blog tutorials 110507 |
For method 2 you might find a rotary cutter useful, but it isn't essential
 |
| From blog tutorials 110507 |
The bias tape makers come in a variety of sizes, I have 12 and 25 mm, which is about 1" and 2" respectively. I'm going to make 12mm as that's what I need right now!
 |
| From blog tutorials 110507 |
Step one for either method is to mark the bias. This is 45 degrees from straight grain (Straight grain is the grain parallel to the fabric's selvedge). I normally tape my fabric to something with right angles to make sure the grain isn't off, then I use my Patternmaster ruler to mark the bias. If you don't have a patternmaster you can use a protractor or a set square.
 |
| From blog tutorials 110507 |
You can see that I have marked the bias at the corner of the fabric. This is important for method 1.
Method 1
Keep marking the bias lines at intervals approximately twice the width of the finished tape - so here for 12mm tape I am marking 25mm apart.
 |
| From blog tutorials 110507 |
You should have a piece of fabric the looks like this
 |
| From blog tutorials 110507 |
Cut off the triangles at each end, but do not cut along the cutting lines. You will have a parallelogram.
 |
| From blog tutorials 110507 |
Now comes the tricky bit. Mark a seam allowance (as I'm lazy I used a stripe instead). Bring the two long sides together, right sides together so the first line you drew (on the other side of the rear of the back bit of fabric in this picture) aligns with the cut edge
 |
| From blog tutorials 110507 |
Pin all along the long edge, making sure cutting lines match at the seam line. Once you have lined the first up the rest should follow quite easily, but keep checking.
Once it's all pinned it will look like a tube with a diagonal seam (which is what it is!
 |
| From blog tutorials 110507 |
 |
| From blog tutorials 110507 |
 |
| From blog tutorials 110507 |
Press open the seam, then start cutting along the lines you have marked, which, if you have done it right, will join up into a continuous spiral.
 |
| From blog tutorials 110507 |
 |
| From blog tutorials 110507 |
Method 2
I have a fat quarter of cotton shirting. I started as above, by marking the bias. If I stop when I get to the corner as in method one, I'm not going to get a lot of tape out of the quarter!
 |
| From blog tutorials 110507 |
 |
| From blog tutorials 110507 |
For this method you cut the strips out before you seam
 |
| From blog tutorials 110507 |
 |
| From blog tutorials 110507 |
Now for the time consuming bit! Pin each piece to the next as shown below. You can see how I've managed to match stripes (on this bit, I have to admit I didn't do it on every join!)
 |
| From blog tutorials 110507 |
 |
| From blog tutorials 110507 |
 |
| From blog tutorials 110507 |
 |
| From blog tutorials 110507 |
 |
| From blog tutorials 110507 |
Now you have a pile of unfolded tape. Folding it into bias tape is the same whichever method you used to get this far.
If you don't have a bias tape maker
Press the tape in half lengthwise
 |
| From blog tutorials 110507 |
Unfold, and press one edge to centre line
 |
| From blog tutorials 110507 |
Repeat with other edge
 |
| From blog tutorials 110507 |
This is OK for short pieces, but if you are making a lot, you want a bias tape maker
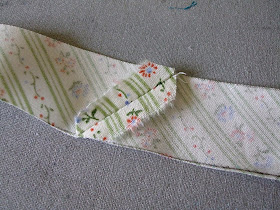
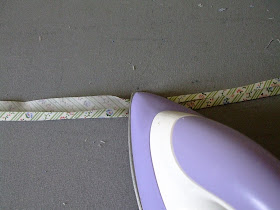
With a bias tape maker
It is almost too easy! Feed the end of the tape through the machine and secure to your ironing board with a pin. Pull the bias tape maker along the tape, with the iron following a few cm behind. try and keep the tape central in the tape maker, and slow down when you get to seams so it doesn't pull.
 |
| From blog tutorials 110507 |
Ta-da!
 |
| From blog tutorials 110507 |
The fat quarter got me more than 6 metres of 12mm tape! I didn't measure the blue stuff, as yo can see, it's a lot from a 35cm-ish width of fabric.
Bias tape is great as a facing, as a binding or as an appliqué. Once you have made your own you will never go back to the pre made stuff!
Thanks, great tutorial.
ReplyDeleteI think there might be a method 3. Reference your method 1 - Now only cut off one of the end triangles. Take that triangle and sew it to the other end and you will end up with the same shaped parallelogram, but without the waste.